Donut Fever or mini donut disaster

This all too common ailment afflicts nearly as many as the flu, but it can be even more devastating to vegans who cannot easily satisfy their donut craving. Recently a friend of mine fell victim to this affliction, and a very rare strain known as mini-donut fever. As you may know, the only cure is to eat donuts, in this case mini-donuts. So we set out on a mission to make our own vegan mini donuts using the recipe from Vegan Yum Yum as a starting place.
It should have been an an easy enough task, with a clear recipe to follow, but things did not go as planned. Plain baked donuts are good, but blueberry sounded even better so we threw in a handful of wild blueberries to the batter of our first batch, but the batter was already looking awfully wet. We carried on, hoping for the best. The best was not so good. Despite the recipe saying that you should not grease the pan (it was non-stick anyway) the donuts stuck horribly, and because the added berries, fell apart when you tried to remove them. They still tasted rather good though, so we ate a few of the ugly bits.
Round two, we added more flour and greased the pan. This batch came out better than the last but as they sat out, became rather crunchy. I would still consider these fairly successful. We glazed them with a blueberry juice glaze which was fantastic and so pretty.

Next we decided to go for some pumpkin spice donuts. This time we abandoned the recipe completely. Bad idea. While these donuts had the correct consistency, fluffy and light, the flavor was just off completely. There was neither enough pumpkin nor spice. Three out of three taste testers agreed, these donuts tasted like…hay. Yep, you got that right. They tasted like dried grass. I’m sure you could pass them off to some unsuspecting health-food type, but that is not what we were interested in. We had already frosted them before we realized that they tasted so bad, so at least they looked pretty.
The unfortunate side effect of this endeavor is that I’ve now come down with donut fever myself. Look out for some more (hopefully more successful) donut making in the near future.
Also get ready because it’s almost time for Veganmofo 2009. I can’t wait to get cookin’. Last year’s veganmofo really inspired me to work harder on this blog and get it going from something that I did only for myself to something I shared with people.
Yeasted breads

I haven’t been sleeping very well lately. I know it is because I’m jet-lagged but the past week has been a little strange. It has contributed to a wonderful development in my home though. When you wake up at 3 am and your fridge is empty, it makes perfect sense that you should bake some bread. Right? I thought so. In the past week I’ve been experimenting with some yeasted breads. I can’t help but still get a thrill when they rise up like magic.
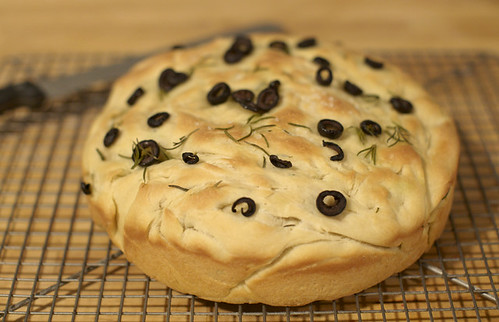
Perhaps the most delicious and filling was the rosemary focaccia. I used the recipe in The Joy of Vegan Baking pretty much exactly as it was written. This loaf was dense and yet fluffy, moist and salty and completely packed with rosemary flavor. The one time I’ve made focaccia before it was not nearly this thick and wonderful. I want to eat a million sandwiches off of this stuff. The crust has a light oiled flavor and the olives compliment the whole thing quite nicely.

Another project was a basic french loaf. This was the simplest of the batch but still satisfying. It was plain but great for toast. The crust was fairly crunchy as I tested out the technique of throwing water in the oven to steam it. I was impressed for it being such a basic loaf that it really was so good. This was also the quickest to prepare, easy to turn to in a pinch.

When I was researching tips to make my french loaf, I discovered that everyone in the bread making world seemed to be crazy about this No-Knead recipe from the NY Times. Of course I had to try it as well, despite it having a rising time of 20 hours total. Everything I read, promised me a light interior with a beautiful crunchy crust. I was not let down. I must admit that I definitely messed up this recipe. At hour 12 or so I could see that my dough was definitely too wet. Being that it had been rising for so long I just decided to go ahead with it anyway and hope for the best. Though I know that something was off, just by looking at the dough, it still tasted amazing. It was insanely good and very easy to assemble, despite my mis-measuring somewhere. If you have the foresight to put this together a day in advance, it is well worth the wait.
Beer crust pizza

I think there is a rule that upon becoming vegan you must also instantly become obsessed with pizza. Perhaps it is the seemingly elusive nature of the delicious vegan pizza, but every vegan I know goes crazy for the stuff. I mean, pretty much everybody loves pizza, but it does seem that it’s like crack for us vegans. Nowadays there are tons of vegan pizza options, you can even go buy yourself a slab of daiya drenched pizza at Whole Foods, so there isn’t a problem finding a decent slice somewhere.
There is still something tremendously satisfying about making your own pizza though. You get to top it with just the right ingredients exactly how you like it. While pizza is a common occurrence here (Shawn and I are pros), I wanted to try something a little different than the usual. I found a great recipe for beer pizza crust and was smitten. I topped it with this great sauce from Vegan Yum Yum that has a rich cashew flavor so there was no need for additional cheese. The simplicity of this pizza lets the full flavored crust shine through without being boring. The beer gives it just a little more excitement than a typical pizza crust and is crunchy on the the outside and fluffy on the inside. The recipe makes enough for two crusts so you can experiment with your toppings. Of the two I made the one pictured above was by far the best with just tomatoes, sliced olives and garlic.
If you love pizza and you love beer you have no excuse for not making this crust. It’s easy and completely enhances your pizza experience.
Beer Pizza Crust
from King Arthur Flour
4 cups all purpose flour
2 tsp active yeast
1 tsp baking powder
1 ½ tsp salt
2 Tbps olive oil
12 oz room temperature beer
Mix and knead together all ingredients until they form into a smooth even dough. Cover and let rise for 30 minutes to 2 hours.
Preheat your oven to 500° with the pizza stone inside. If you don’t have a pizza stone you can use a cookie tray but you will not need to preheat it.
Divide the dough in half to make two crusts. You can freeze the dough if you’d like to save for later, just make sure to defrost in advance.
Spread out the crust on a piece of parchment paper or your oiled cookie tray. Stretch it until it is 10 to 12 inches across or toss in the air if you’re coordinated enough. Brush the crust with olive oil, covering completely, and sprinkle with any pizza seasonings you might like. Place the parchment paper on your pizza stone or the cookie sheet in the oven and cook for 2-3 minutes.
Remove the pizza from the oven and top with sauce and any other toppings you might want. Put back into the oven and cook for 7-10 minutes. The crust should be golden and not too brown. Remove and let cool. Slice and devour!
Roman Holiday

A crazy thing happened in Rome. Shawn and I had spent the day walking and riding bikes around the city and were completely exhausted. We were contemplating our last meal but could only decide that we wanted to try the soy gelato from Blue Ice. We got our scoops and were enjoying them in front of Trevi fountain, which was packed with tourists, when I noticed two familiar faces: Lex and Kristen of Vegan-LA. I have to be honest, Shawn and I run into people we know in some unexpected places, but in another country and other vegans? Crazy, right? Turns out they’ve been traveling through Europe for the past 6 months working on vegan-europe.com
We hung out and chatted for a bit and they mentioned they were going to try a new vegan restaurant/bar. Since we were starving, we of course wanted to go check it out with them. Only problem was that it was about 5k away and we were dead tired from walking. Luckily they had a car and offered to drive us. Of course, it was a Smart car. Have you ever seen a Smart car? They’re TINY! If you’ve ever seen one in the US, they’re even smaller in Europe. In any case, we all piled in, despite it only being a two-seater and headed out of the city center to try out Rewild.

Rewild is a casual, completely vegan restaurant in Rome with beers on tap and a selection of icy mixed drinks. While the menu was in Italian, our waiter (who I’m pretty sure was the owner) was very helpful and translated anything we didn’t understand. Shawn and I started with some bruschetta made with tomato and vegan sausage. This spread was great and the bread was nice and crusty too. A great starter, especially since we were so hungry.
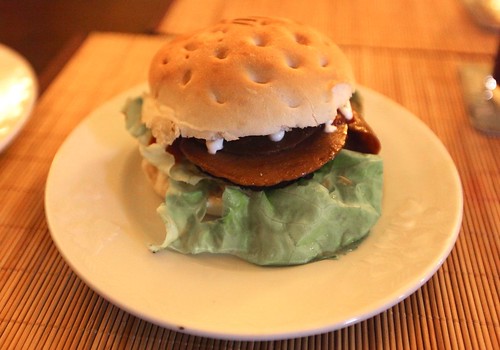
I ordered a panini with seitan and garlic mushrooms. The seitan was sliced super thin and the mushrooms were cooked just right, not too firm or squishy. It was very satisfying and the kind of thing I could see myself ordering regularly. My only complaint was that bun was very full and not exactly pressed like a panini. It still tasted great though.

Shawn also got a panini; his with the basic lettuce, mustard, vegan mayo and…beets? Don’t get me wrong, it tasted really good, probably even more tasty that the panini I ordered but the beets were definitely a surprise. It was actually fairly refreshing to have the cool sweet beets in the middle of what would have otherwise been a fairly conventional sandwich. Given the choice, I’d still go with tomato though.

Last but certainly not least, we split a vegan jam filled crepe. I love crepes, I really do. Any opportunity I have to eat them makes me ecstatic, especially when they are good like this one. I was very pleased. It’s not easy to make a perfect crepe, but this one was spot on. Light and just a tiny bit crunchy with just the right amount of jam inside. Delicious!
Following our amazing meal, we all piled back in the smart car and made an impromptu tour of a few of Rome’s sites. We climbed out in front of the Vatican as if we were exiting a clown car. It was great fun! I’m so grateful that Lex and Kristen showed us this really cool restaurant and carted us around with them for the rest of the evening.
If you want to see more photos from our trip you can check out Shawn’s shots over at studiodrome. Coming up I’ll try my hand at some Italian inspired meals. Ciao!
Vegan Italy

Last week Shawn and I went to Italy! He was the best man in a friends wedding that took place in the town of Cortona. It was an amazing trip, a beautiful wedding and an awesome experience all together. I love Italian food as much as the next person but I have to say I was a bit worried about getting meals that were totally vegan especially since I don’t speak any Italian whatsoever. Quite the contrary to what I had feared, I had some truly unforgettable vegan meals.
The wedding was a full two day event with multiple five course dinners, not to mention lots of wine, hor d’oeuvres, and breakfast treats. Lucky for us, we had our own special vegan menu. The majority of the meals were vegetarian to start with and minor adjustments were made to accommodate us. Everything was insanely delicious. All the vegetables were so fresh and delightful. The tomatoes were like nothing I have ever had before and courses dressed with olive oil were to die for. I still can’t get over how delicate and fresh everything was and how well all the flavors complimented each other.

After the wedding, we spent the remainder of our time in Rome as neither of us had ever been before. We managed to see a great deal of the city by foot, on bicycle and on a brief Smart car tour (which I’ll get back to later). We walked through the Colosseum, hiked through the ruins of the Roman Forum, drank beer on the Spanish steps and threw coins in Trevi Fountain. It was a bit unreal. And of course we sampled some of the city’s vegan offerings. Our first stop was the Beehive Cafe. This small vegetarian restaurant, located inside the Beehive Hotel, is cute and comfortable. They have a handful of vegan options and a very accommodating cook who helped us put together our meal. They use a sliding pay scale and no set portion size so you only get what you want to eat and only pay what you feel you should (of course there are recommendations).

We started with a large vegetable soup filled with zucchini, peas, tomato and orzo. This soup was unbelievable. This could possibly be one of the best soups I’ve ever had. It was hearty and rich, full of vegetables but not overly heavy. There was a touch of sweetness to it and each vegetable was able to shine. I could eat this soup for days. In fact I could go for some right now. Paired with some fresh bread this stuff was like heaven.
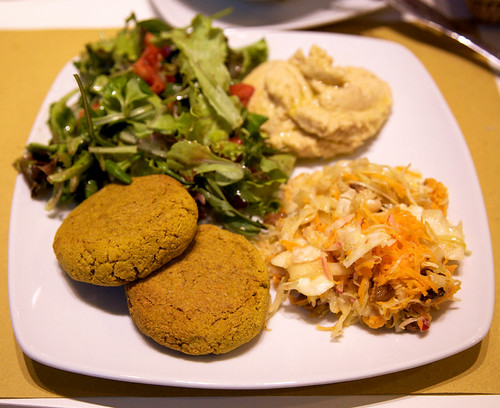
We also got a plate of hummus, vegetable patties, salad and some mixed vegetables. The hummus was also superb. There were two different veggie patties available the day we went and we chose one with chickpeas, nuts and spices. They were a little bit crunchy on the outside but soft and perfectly spiced on the inside. I really enjoyed the flavor of these but they were a bit dry on their own. I would have preferred these as actual veggie burgers but they were quite good mixed with everything else on the plate.
I highly recommend trying this place if you’re in Rome as it has a really nice atmosphere and they are very helpful and speak English too so that’s a plus. The food is unique and well thought out and is a good alternative to traditional Italian meals.

We also tried the only other vegetarian restaurant that I new of: Il Margutta. We stopped here for lunch, where instead of their normal menu, which has it’s own vegan section, they have a buffet with options of how many add-ons you’d like. While I enjoyed the food here and thought it was well crafted, I wasn’t blown away. Looking back, I would have preferred to order one dish than sample a bunch. I will say the seitan in one of my dishes was really great, but I only had a small serving. We decided to get the dessert option (despite the fact that I was convinced they weren’t going to have a vegan cake) and they did in fact have both a chocolate and carrot cake. These cakes were obviously made of quality ingredients and were overall pretty good but they were a bit grainy and oily. I was happy to have them anyway but they weren’t amazing either. I will say this place was packed for lunch and it was a pretty good deal overall, whereas the dinner menu is much more pricey.

Just for a second though, let’s talk about my favorite thing in Italy: ESPRESSO. I am without a doubt a caffeine addict. I make myself a soy latte every morning and usually can’t get through the day without something in the afternoon as well. I also have a fairly sensitive stomach, which means me and coffee don’t really get along. Through the years I’ve found ways to manage this like drinking espresso instead of coffee, always having it with soy milk, etc. In Italy though, I am able to just have espresso with a bit of sugar and I’m set. It’s so rich and delicious and doesn’t have the same caffeine jolt as the stuff over here. It is more flavorful and much less abrasive. It baffles me that people don’t want to drink stuff this good here and instead prefer bitter, watery coffee. It is a mystery! In any case, I had a week of sweet deliciousness and feel so lucky that I did.
But wait there’s more…come back tomorrow for a surprise find of a fully vegan restaurant and adventure tour that ensued…


