Italian Eggplant Pasta

Half way through today I realized that it’s my veganniversary. I’ve been vegan for 5 years now. I’m pretty excited about it. I’m looking forward to a time when I’ve been vegan longer than not.
I thought I’d share this little recipe that I made the other night. It’s inspired by eggplant cacciatore, but there aren’t any bell peppers. So I’m not sure what to call it, but it’s delicious and you should make it. Maybe I’ll call it Super Yummy Eggplant Pasta Thing. What do you think?
Anyway, here’s the recipe, maybe you can come up with a name.
Super Yummy Eggplant Pasta Thing
- 1 eggplant, chopped into bite size cubes
- 1 red onion, chopped
- 1/2 small head of garlic, minced
- 1 tsp oregano
- 1/2 tsp thyme
- 1/2 tsp salt
- 1/4 cup nutritional yeast
- 1/4 tsp pepper
- 1 26 oz jar of marinara sauce
- pasta of your choice
- olive oil
Begin with the eggplant by salting the pieces and letting them sweat while you prepare the other ingredients.
Put on a large pot of salted water to boil for your pasta. Cook according to the instructions for your particular pasta. I only recommend doing this first since I made an entire package of penne and the water took forever to boil on my spare burner.
Heat about 1 Tbsp of olive oil in a large sauce pan over medium heat. Once the oil has warmed, add in the onion. Saute until it has softened. Add in the garlic and stir until it becomes fragrant.
Add the marinara and spices into the pan, stiring together. Reduce heat and let simmer. A note here, my marinara had basil already in it, but if yours doesn’t you may want to add 1/2 tsp.
Rinse your eggplant of salt and dry. It doesn’t have to be bone dry, just get most of the water droplets off.
While the sauce is simmering, in another pan, heat some more oil and add in the eggplant. Saute until the eggplant is slightly browned and softened.
Combine the sauce and the eggplant in whichever has the larger pan. Continue to simmer for about 10 minutes. That’s it!
You can either mix with all the pasta or serve as a chunky sauce on top.
Figs!
 My experience with figs has been limited almost exclusively to fig newtons. I just wanted to get that out of the way.
Then out of nowhere, I just really wanted to try figs. Perhaps it was because I was being bombarded with yummy fig ideas.
First it was a fig and cheese sandwich I saw at a restaurant (although it wasn’t vegan). Then I came across this recipe. When I passed a box of fresh figs at the market, I had to buy them.

So the sandwich. It’s just a basic grilled cheeze with some sliced figs inside and a bit of spicy mustard just for fun. So good! I may have had a few of these. And by that, I mean I did. Cheesy and delicious with just a hint of sweetness from the figs.
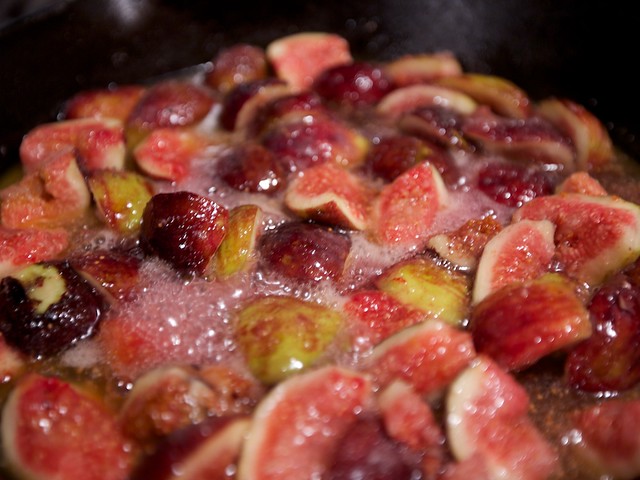
Next up was the fig upside down cake. Part of what excited me about this recipe was making a cake in the cast iron skillet I just recently acquired. I’m a big fan of any multi-use cookware. Not to mention for those of you looking for a little more iron in your diet, cooking in an iron skillet will actually add some iron into your food. See, cake can have health benefits!

The cake was delicious; decadently sweet with a rich brown sugar flavor. I opted to make my own brown sugar by mixing molasses into regular granulated sugar,which definitely gave the cake it’s own distinct flavor (and more iron!). I probably could have let it cool a bit longer so the figs were not so juicy when I flipped it, but it’s not always easy waiting for cake. Topped with coconut whipped cream, this easy cake could be a treat on a night in or a fancy dessert for guests.
Vegan Fig Upside Down Cake
adapted from here
- 1 1/2 pounds fresh figs, stemmed and quartered
- 1 cup granulated sugar
- 4 ounces Earth Balance
- 1 cup granulated sugar mixed with 1 Tbsp molasses
- 1/3 cup canola oil
- 2 cups all-purpose flour
- 1 teaspoon salt
- 1 teaspoon baking powder
- 1 teaspoon baking soda
- 1 1/2 teaspoon vanilla
- 1 cup almond milk
- 1 tsp vinegar
Preheat oven to 350°.
Mix figs and sugar in a bowl and set aside. Melt the Earth Balance in an iron skillet on medium heat. When it is warm, add the figs and sauté until softened, about 5 minutes.
Beat the vinegar into the almond milk until frothy and set aside. Mix the oil and sugar until combined. In a separate bowl, mix all the dry ingredients, using a whisk. Combine the sugar, dry ingredients, and soy milk. Mix until there are few lumps.
Pour the batter over the figs in the skillet. Bake for approximately 35-40 minutes.
Remove from oven and let cool for at least 30 minutes. Invert on plate and serve.
I highly recommend adding some whipped coconut cream topping.
good morning crumpets

Somehow I became obsessed with the idea of making crumpets. It may have had something to do with going to see Alice in Wonderland. I had to have them though, despite possibly never having them before in my life. Oh what I’ve been missing. They’ make an amazing breakfast or afternoon tea snack. Crispy on the outside and soft and moist in the middle, they’re like english muffins and pancakes had a baby. And perfect with a bit of earth balance and jam. Now you can make them for yourself.
Vegan Crumpets 1 3/4 cups all purpose flour 1 rounded tsp yeast 1/2 tsp baking powder 1/2 tsp salt 3/4 cup soy milk, room temperature 1/2 cup water, room temperature 1 Tbsp Earth Balance, meltedMix all ingredients together in a bowl until there are no lumps. If you’re using a stand mixer it will take a minute or two with the paddle attachment. Cover and set aside in a warm place so that it can rise. It should take about an hour, and you’ll be able to see a bunch of bubbles popping to the surface.

When your batter is looking good, you’ll want to head up a griddle or pan. It’s best to use a medium low heat so that they can cook all the way through without burning.

Grease two crumpet rings and place them on your pan, making sure they’re flat. Scoop or pour about a quarter cup of the batter into the rings on the pan.

After about five minutes you’ll see the edges begin to firm up. You can then gently remove the rings using tongs or an oven mitt.

They should hold their shape. Let them cook for a minute more without the rings.

Flip them over and let the other side cook through, another 5 minutes or so. That’s it! Eat them up! Quick while they’re still warm!

The Best Vegan Fudge Ever

What is the one food you remember from your childhood as being better than anything else? Was it the sugar cookies your grandmother made? The grilled cheese sandwich your dad grilled especially for you? Maybe that’s not it, but there was something, wasn’t there? And you’ve never been able to find something as good anywhere else.
For me, the one thing I remember as being incomparably amazing was the fudge my mom made. Even though she would usually sabotage it with walnuts, I would sometimes get a small batch just for myself. It’s been years and years since I’ve had anything even comparable to that fudge. I mean, even before I was vegan, there wasn’t anything nearly as good.
Finally, my mom agreed to show me her recipe step by step so I could veganize it. She even said it was ok for me to share it with you, which I think is pretty generous, considering it is the best fudge ever. Thanks mom!
Ok, here’s what you need…

1 1/3 cup of non-dairy cream, unsweetened

2 2/3 cup sugar, yeah, that much sugar

4 ish oz bittersweet chocolate

2 Tbsp corn syrup

4 Tbsp Earth Balance
Put everything in a medium sauce pan and stir together. Turn the heat on to medium high and stir occasionally so that the chocolate melts evenly. Bring to a boil and using a candy thermometer, or your cunning senses, heat slowly to the firm ball stage, about 240° – 250° F. If you want your fudge a little creamier you don’t have to go quite this hot.

To check the firmness, you can spoon a small bit into some cold water. Take out the cooled piece and roll between your fingers. The harder it is, the firmer your fudge will be. Once it reaches the desired temperature, remove from heat and allow to cool for a few minutes. In the mean time, grease a pan to put your fudge in. Mix in 1 tsp of vanilla.
If you’ve made it through all that, get ready for the hard part. Using a spoon, beat the fudge so that air is incorporated into the mixture. Don’t stir, beat. If your arm doesn’t get tired, you’re not doing it right. In fact, you might want to have a backup beater on hand to help you. My arm is still sore from this part actually. Do this for a couple minutes, until the mixture is a bit fluffier.

Pour the fudge into your prepared pan and smooth over a bit. Slice into chunks once it has cooled somewhat, but is still slightly warm. You probably want to use a butter knife as well and not a ridiculous sharp one like the one above. Also, go ahead and make those chunks pretty small, you’re better off this way.
You can totally snack on some bits here when it’s still warm, but know once you start it will be hard to stop. I personally like it best once it has cooled completely and hardened.
So the verdict? It’s almost exactly the same as I remember it. That sugary sweetness that melts in your mouth with a rich chocolate flavor. The flavor of the mimicream definitely has a subtle effect, but in the end one I like, giving it just a hint of nuttiness. I may try a few variations, and practice my beating technique, but I wouldn’t hesitate to say that it was a complete success. I should also probably mention this is the recipe for a double batch so go ahead and half it if you like. Although you might not want to. On the other hand, you might eat it all in one day so beware. Not that anyone I know would do that. Never.
Pumpkin Ravioli

Recently all I want to eat in the world is pasta with some sort of nutritional yeast sauce. It’s just so tasty and the perfect thing after a long day. In order to spice things up a little and tie in some of that fall flavor, I tried my hand at making pumpkin ravioli. Did you hear about the pumpkin shortage? Word on the street is there might not be any pumpkin left after Thanksgiving this year. Stock up before it’s too late. While you’re at it, you should try some of these raviolis.

This ravioli is rich and filled with all the essence of fall. It is perfectly paired with one of my new favorite sauces, a buttery sage sauce. I was so hungry that I kind of skipped the part where I write down the recipe for these guys but I can at least give you a general idea. All measurements are approximate.
Pumpkin Ravioli Filling
1 can pureed pumkin
1/2 cup Earth Balance
1/4 cup nutritional yeast
1 Tbsp olive oil
1/2 tsp Sage
1/2 tsp thyme
1/4 tsp fresh ground pepper
1/4 tsp salt
pinch of nutmeg
1/4 tsp red pepper flakes
Melt the Earth Balance in a small sauce pan over medium heat. Add the pureed pumpkin and stir to combine. Add the seasonings to taste and cook for about 5 minutes. Simple, right? Spoon into your prepared pasta dough (or whatever you’re using), form into raviolis and cook for 3 – 7 minutes.
The sauce, is very similar to the filling but with a completely different tangy flavor. It goes good with almost any pasta dish, but you probably want to avoid that since it’s pretty rich. It will be hard to resist though. Just so you know in advance. I never said this recipe was good for you.
Butter Sage Sauce
1/2 cup Earth Balance
1/2 tsp sage
1/4 cup nutritional yeast
juice of 1/2 lemon
ground pepper
Again melt the Earth Balance in a small sauce pan until it starts to bubble. Add the sage and nutritional yeast and let cook for about 3 more minutes, until it thickens slightly. Remove from heat and add lemon juice. Stir to combine fully and serve and devour!